
Plan Cargo Loads & Save Freight
Great tool for logistics / 3PL applications – show customers the loads before shipments
When planning a truck/container load, every company uses some sort of loading factor threshold to estimate when a shipment should be cut off. A few of the most common load factor examples are: raw cubic volume, total weight, and product value. The problem with these arbitrary load factors is they do not accommodate operational restrictions or opportunities such as weight distribution, stacking restrictions, or stop off segregations, causing them to be inaccurate.
By using MaxLoad Pro, 3rd party logistics companies can now know and show accurate load factors for optimization during order consolidation and routing operations. One application example could be a customer of a 3PL using a web-portal powered by MaxLoad Web API giving the customer the freedom to build their own order shipments online based off reliable load factors and graphics supplied by MaxLoad in near real time.
Calculate Floor Space for LTL and FTL Freights
MaxLoad Pro offers several different options for quickly calculating and reporting cubic space and floor space utilization.
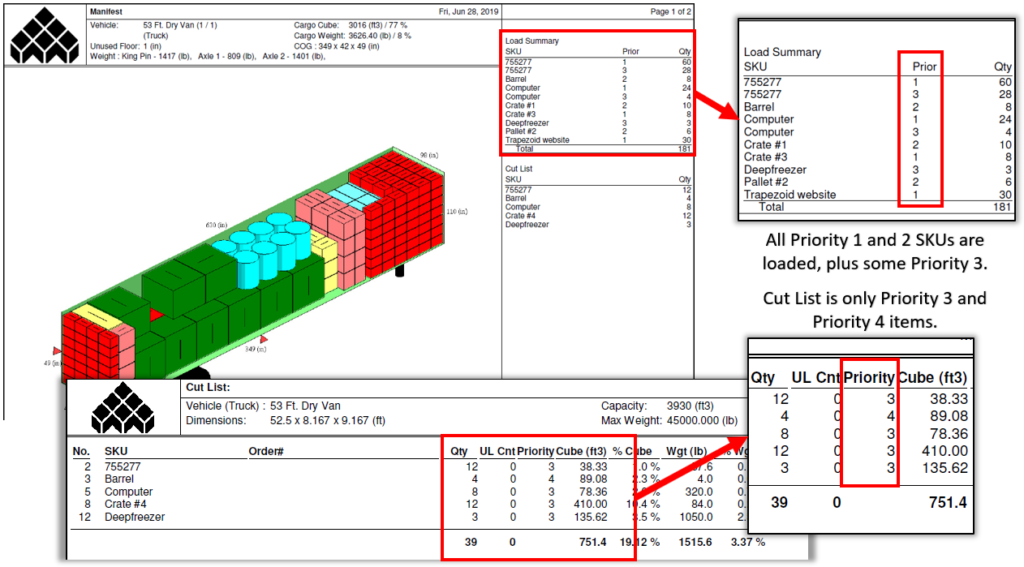
For example, every time MaxLoad Pro calculates a vehicle manifest, it will display the End Gap results — that is, the number of inches left in the trailer from the back doors to the last product inside. This information can allow a customer service representative to quickly and easily present possible options for additional freight to be loaded into the vehicle, perhaps suggesting a switch from LTL to FTL shipment. You can see an example of the “end gap” on the left-hand side of the image displayed below.
MaxLoad’s reports also display this kind of information. MaxLoad Pro’s “Load Summary” report lists the floor space used at the very top. This is a helpful tool to use when considering combining multiple LTL shipments together- if you calculated 2 orders and each filled about 45% of a container, you could easily suggest shipping them together.
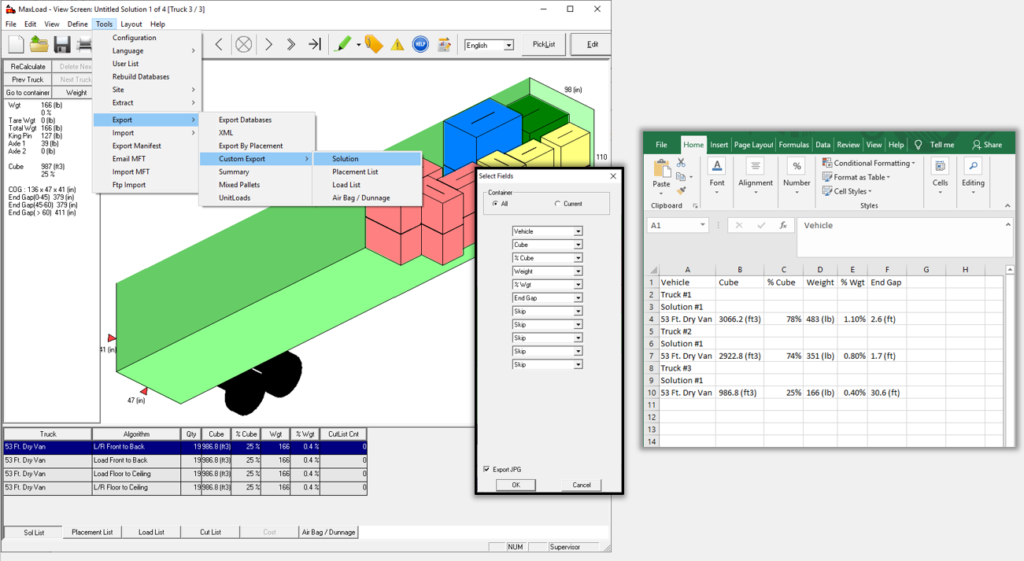
MaxLoad’s calculation results (including cubic space & floor space utilization) can also be exported to Excel, or to SQL Database tables for integration with other programs. For customers calculating large amounts of freight or pre-planning many loads in advance, this can be a very valuable tool.
Load LTL Freight using Priority, Stopoffs & Orders
When creating your Manifest Picklist in MaxLoad Pro, you have several different options for grouping items together.
- Priority Groups: Every SKU in your Picklist can be assigned a Priority number, and all SKUs with the same Priority number will be loaded together. For example, any SKU with Priority 1 will be loaded before any SKU with Priority 2. This is useful for customers who know they will be shipping FTL, suspect that their full manifest list may not be able to fit in the container, and want to ensure that the most important goods make it into the load before less important goods.
- Stop-Offs: Stop-off groups are loaded in the opposite order as Priority groups; i.e., Stop Off 1 is the loaded at the back, Stop Off 2 is immediately behind that further into the truck, and so on. This is a logical loading method for containers that will make multiple stops for unloading, as you do not want to have to unpack an entire trailer to unload one order, then repack it again before moving on to the next stop location. This is an excellent tool for LTL shipments.
- Stop-Offs AND Priority Groups: MaxLoad Pro allows you to utilize BOTH Stop-Offs and Priority Groups, if necessary. SKUs are loaded together first by their stop-offs, and then within each stop, SKUs are grouped and loaded by Priority groups.
- Orders: Order Numbers are one more way for you to group SKUs together. Order Numbers can be entered purely for informational purposes, or you can use them as an additional grouping mechanism within Priority groups.
Use Different Load Profiles for different Customers
MaxLoad Pro comes with a special tool called “Load Rules” which allows users to customize the way the software calculates load planning solutions.
For example, by default, MaxLoad Pro WILL allow different Stop Off groups to stack on top of one another inside a trailer, in order to maximize space utilization. However, if your LTL customers would prefer for this to not occur, you can turn on a Load Rule that prohibits mixed stop stacking. This is just one of many available Load Rules you can customize.
You can create multiple Load Rule profiles, so that at the time of calculating your Manifest Picklist, you can choose which Load Rule profile to use in order to ensure the load is calculated with all necessary rules considered.
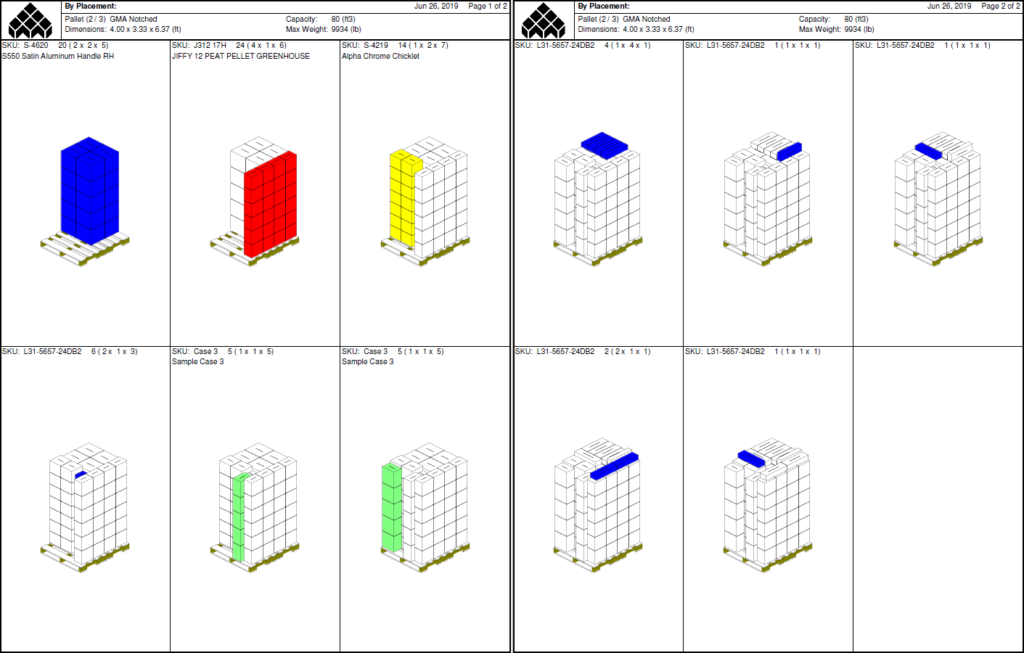
Create Loading Diagrams with Step-by-Step Instructions
Calculating a load plan is only one step in making sure your LTL and FTL shipments are as optimized as possible; once that load plan is generated, it’s up to the people who load the containers to make sure that the plan can become a reality.
This is where MaxLoad Pro stands apart from other programs- even without customized load rules, our algorithms are much more accurate at taking into consideration the “real world” limitations that influence how a picklist can be loaded.
In addition to calculating load plans that can actually work in the real world, MaxLoad Pro offers another benefit to the people responsible for loading your containers & pallets: step-by-step loading diagrams. These easy-to-follow visual instructions eliminate the guess work of what to load first, second, third, and so on. We provide these kinds of reports for mixed pallet building and trailer loading. This ensures that you WILL be able to fit the load MaxLoad Pro has calculated for you.
Another report we offer is the “Load By Stop Off” report: this is useful to help drivers oversee the unloading at each destination. It provides graphical illustrations and listings of each SKU quantity per stop of the shipment.
Create Loading Diagrams with Step-by-Step Instructions
- King pin & axle weight
- Manual adjustment
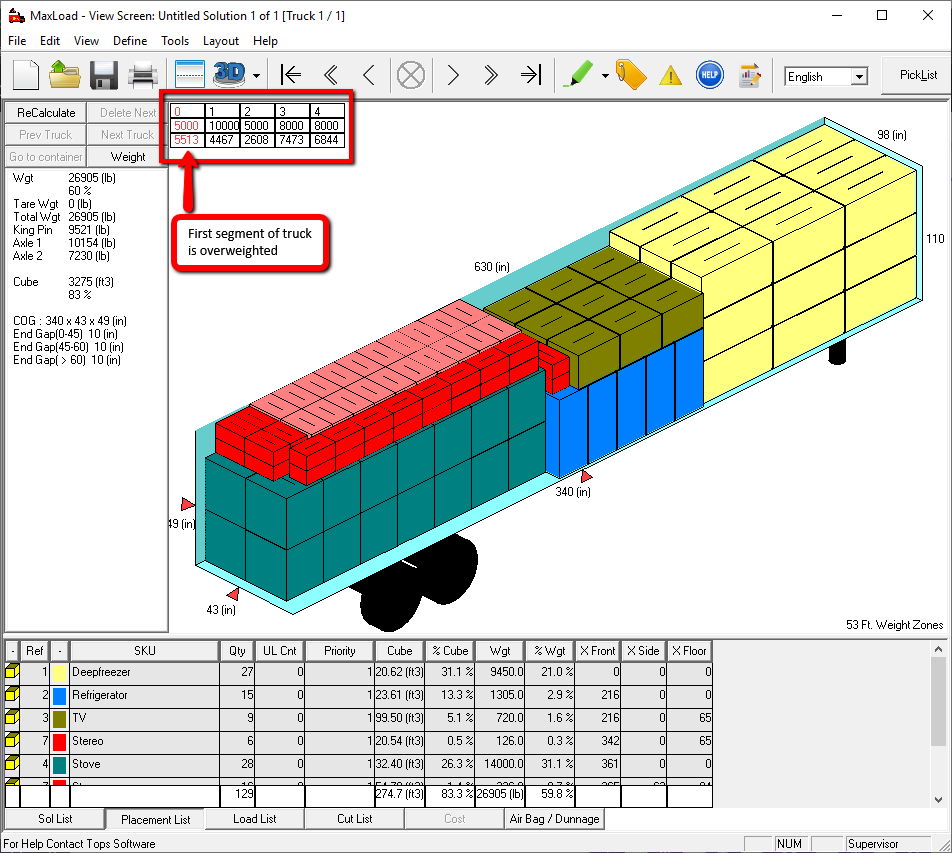
- Weight limit per vehicle segments
MaxLoad Pro has several tools you can use if you are concerned about weight balancing in your loads.
First, any vehicle you define in MaxLoad’s database can be set up with axles and axle weight limits. By default MaxLoad will calculate a load based primarily on cubic space efficiency, but you can change your settings so that MaxLoad will not calculate any load plan that violates these axle weight limits.
Whether you set up weight limits or not, MaxLoad Pro does its best to calculate the weight being carried by each axle of the vehicle. This weight is displayed on the left-hand side of the Solution screen, along with MaxLoad Pro’s calculation for where the container’s Center of Gravity is.
If you do not like the way weight is distributed in the load MaxLoad Pro calculated for you, you can always manually edit the load to better suit your needs. We offer a “quick edit” that allows you to simply click to move the entire load forward or backward within the trailer, or you can use our Edit feature to manually place SKUs where you need them to go. The Edit screen will keep track of your new weight balance as you make adjustments.
There are special ways of calculating based on weight, too. For example, we have two loading algorithms (Flatbed and Load Floor to Ceiling) that load items in full layers from the bottom of the trailer, up. These are good for very heavy items that need to be spaced out along the floor. We also have an option for calculating using “Weight Segments” in the vehicle. When defining your vehicle, you can specify regions of the container and weight limits for each region. Then, when MaxLoad calculates your solutions, the weights in each section will be displayed. If any section is carrying too much weight, it will be shown in red.